Looks like SharePoint Designer will be free starting April 1, 2009. I was unable to verify this from an official Microsoft site but did see it referenced on more than website.
Update (4/8/2009): SharePoint Designer 2007 can be downloaded free of charge from the official MS Office SharePoint Designer site.
.
Tuesday, March 31, 2009
Two Approaches for Deploying SharePoint Solutions
I've come across two approaches for deploying SharePoint Solution Packages. There are of course other ways of doing this, including a cafeteria-style combination of both of these. Also, I haven't covered deploying Features as Solution Packages using Visual Studio 2005 here.
To give some background and perspective the following figure depicts the three steps in the SharePoint Solution deployment process...

- First the Solution is added to the Solution Store.
- Next the Solution is deployed from the Solution Store to the Content Sites (these can be Site Collections or Sites).
- Finally, if it was deployed as a Feature (a recommended Best Practice) the Solution must be activated at the Site Collection or Site it was deployed to.
Below are the two approaches I've seen and used. I've only used the GUI approach in Visual Studio 2008…
- Command line. This approach can be used universally (regardless of whether the Solution was written in VS 2005 or 2008). However it is manual and generally more prone to user error. You also cannot create a script to complete this process using GUI tools the way you can using the command line. Some samples of stsadm.exe usage are here.
- Add solution: From a command prompt navigate to the directory location of stsadm.exe (C:\Program Files\Common Files\Microsoft Shared\web server extensions\12\BIN\) and enter the following command. If you are not deploying a Feature you can use the file path and file name of the .dll instead. TechNet reference.
stsadm –o addsolution –filename [Path & filename of wsp]
- Deploy solution: From the same file path use the following to deploy the Feature to the Farm. TechNet reference.
stsadm –o deploysolution –name [filename of wsp] -immediate
Activate solution: This is only necessary if you are deploying a Feature. If you are deploying a .dll you should not perform this step. TechNet reference.
stsadm –o activatefeature –name [name of Feature Directory]
GUI. This approach uses a combination a combination of Visual Studio 2008, SharePoint CA (Central Administration) and a SharePoint Content Site. As a prerequisite I am assuming you have VSeWSS 1.2 installed (Scot Hillier has an interesting in-depth review of VSeWSS 1.2 here).
- Add solution: In Visual Studio build the Solution binary by right-clicking the Solution in the Solution Explorer window and selecting Build Solution. If the build is successful repeat the same process but this time select Deploy Solution.
- Deploy solution: In SharePoint CA, on the Operations tab under Global Configuration select "Solution management". Locate your Solution (.wsp) in the list of Solutions in the Solution Store and click it. On the Solution Properties page click "Deploy Solution".
- Activate solution: If the Solution was not deployed as a Feature this step is unnecessary. If the Solution was deployed as a Feature it will be necessary to activate the solution. At the Site Collection level this can be done by doing the following. Navigate to the Site Collection TLS (top-level site). In the upper right corner select Site Actions > Site Settings > Modify All Site Settings. Under the Site Collection Administration column (to the right) select the "Site collection features" link. On the Site Collection Features page locate your Solution/Feature and click the Activate button.
SharePoint Administration Toolkit
The Microsoft SharePoint Product Group has released what looks like a useful SharePoint administration toolkit. The functionality is generally targeted to complex farm or multi-farm scenarios.
Monday, March 30, 2009
SharePoint Error: "The language-neutral solution package was not found"
 Every once in a while when I am in the middle of deploying a Visual Studio 2008 SharePoint project (in Solution Explorer, right-click the Solution and select Deploy Solution) I get the following error: "The language-neutral solution package was not found".
 So far the only solution to this I've found is to save the Solution, close Visual Studio, then reopen Visual Studio.
Friday, March 27, 2009
Adding Assemblies to the GAC
While working with SharePoint I've found the following approaches (choose any one of the following) for adding assemblies to the GAC. A full explanation for all of the gacutil switches can be found in the Microsoft MSDN Library at http://msdn.microsoft.com/en-us/library/ex0ss12c(VS.80).aspx. Note that these are for a single-server farm scenario running Windows Server 2003 R2.
- If Visual Studio .NET (any version) is installed, Start > All Programs > Microsoft Visual Studio [version] > Visual Studio Tools > Visual Studio [version] Command Prompt. From the command prompt navigate to the folder where the assembly to be added to the GAC resides and enter the following...
gacutil.exe -if "[assembly name]
- From a raw Command Prompt navigate to the location of the gacutil.exe program (C:\Program Files\Microsoft SDKs\Silverlight\v2.0\Libraries\Server\) and enter the following...
gacutil.exe -if "[assembly file path & name]
- Log onto the SharePoint server as an administrator and using Windows Explorer copy the assembly to be added to the GAC into C:\WINDOWS\assembly. Do this by dragging the assembly from the bin folder of your VS project into the C:\Windows\assembly folder.
Thursday, March 26, 2009
Okay so where's the 12 Hive again?
Typically C:\Program Files\Common Files\Microsoft Shared\web server extensions\12\.
.
.
Tuesday, March 24, 2009
Intranet Maturity Framework
 Avenue A Razorfish (a Microsoft company) has an intriguing Intranet Maturity Framework Wiki that describes various intranet states based on the relationship between business value and information usage. There are 6 stages identified. On the low end of the scale are intranets that are primarily information publishing in nature. On the upper, more sophisticated end are those intranets referred to as the "Consolidated Workplace Interface" - a unified portal through which everyone in the host organization performs their work or goes for information.
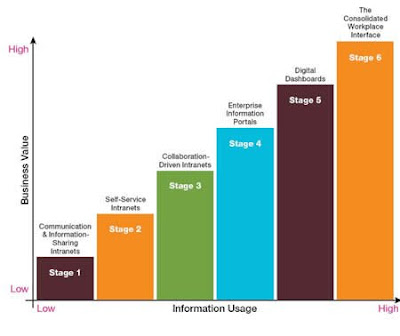
SharePoint Governance
Microsoft has an excellent SharePoint Governance site at http://technet.microsoft.com/en-us/office/sharepointserver/bb507202.aspx.
Friday, March 20, 2009
SharePoint Development with Silverlight 2.0
There are currently three modifications to make to your SharePoint environment for hosting Silverlight 2.0. First install the Silverlight runtime from http://silverlight.net/GetStarted/. Then...
- Add a MIME type for Silverlight. I'm running my SharePoint farm on Windows Server 2003 (these instructions are a little different for Windows Server 2008). On the SharePoint server open IIS, right-click the server node and select Properties. Click the "MIME Types..." button. Click the "New..." button and add a MIME type. Extension: .xap (include the dot ".") MIME Type: application/x-silverlight-2.
- Add System.Web.Silverlight.dll to the GAC. I found System.Web.Silverlight.dll at "C:\Program Files\Microsoft SDKs\Silverlight\v2.0\Libraries\Server\" in my [Windows Server 2003 R2] development environment. So from a command prompt (at "C:\Program Files\Microsoft SDKs\Windows\v6.0a\bin") I entered the command: gacutil -i "C:\Program Files\Microsoft SDKs\Silverlight\v2.0\Libraries\Server\System.Web.Silverlight.dll". Verify the installation by navigating to C:\WINDOWS\assembly (on a Windows 2003 Server OS): System.Web.Silverlight.dll should appear in the list.
- Modify the SharePoint web.config file. This file is typically located at C:\Inetpub\wwwroot\wss\VirtualDirectories\80\ but your mileage may vary.
A good article to start with is Light Up SharePoint With Silverlight 2 Web Parts. Be sure to do the above in the order given. For example, step 3 (web.config) relies on System.Web.Silverlight.dll being in the GAC.
OWA Web Parts in SharePoint
 I was using Outlook Web Access web parts on my "My Site" page and noticed that the "My Inbox" web part doesn't have a "New" button allowing me to create a new email. This seems a bit inconsistent because I can open an email and reply to it.
 So I went looking for a way to display the "New" button. I discovered that there is a lot of flexibilty when displaying OWA parts in SharePoint if you are using Exchange 2007. However at my company we are currently using Exchange 2003.
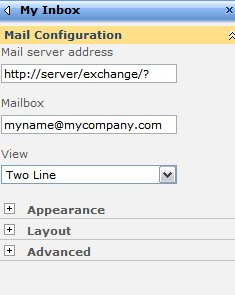
I opened OWA in a browser window and was able to get just my inbox to appear using the http://[server]/exchange/[myname@mycompany.com]/inbox/?cmd=contents. I can do the same with my calendar using http://[server]/exchange/[myname@mycompany.com]/calendar/?cmd=contents&view=monthly. However when I return to SharePoint and attempt to do the same thing I have issues. Site Actions > Edit Page, then Edit > Modify Shared Web Part gets me to the field where I can enter the URL (replace the Mail Server Address"http://[server]/exchange/" with whatever you would like to see the results).
After trying a number of URL/querystring combinations, including those above, I've come to the conclusion that the web part code is obviously doing something to the querystring other than just appending information to it. For example I attempted an injection approach by using one of the URLs above with an ampersand "&" at the end but that didn't work.
I discovered that I could get the entire OWA interface (Inbox, Calendar, Tasks, etc.) in a single My Inbox web part by entering "http://[server]/exchange/?/" (note the question mark denoting the beginning of a querystring) in the Mail Server Address box. This has the benefit of squeezing everything in a single web part rather than spreading several web parts around.
.
Tuesday, March 17, 2009
MSDN Mag: 10 Best Practices for Building SharePoint Solutions
The March 2009 issue of MSDN Magazine has an excellent "best practices" article for developing in SharePoint.
Friday, March 6, 2009
Outline for SharePoint 2007 Development Environment
With less than a year of SharePoint experience, below is a sketch of the steps I've been taking to build a SharePoint developer desktop environment. I'm sure I will be fine-tuning this. For example, I am not using Disk Differencing which would probably make things easier by using the same base OS image to start...
- Create a virtual machine (I use MS Virtual PC 2007).
- Install Windows Server 2003 R2 Enterprise. I'm not certain what the optimal version of Windows 2003 is so a just use the sledgehammer approach).
- Install IIS (include SMTP).
- Apply OS patches.
- Install Visual Studio 2008 Professional.
- Apply any patches and/or Service Packs.
By installing as a standalone no network accounts are required.
I would also like to install SQL Server 2005 in there somewhere (my guess is this will have to be before SharePoint is installed) but I'm not certain of a few configuration elements yet.
Tony Zink has a number of posts that describe at length how to create a VPC development and demo image at http://www.pptspaces.com/sharepointreporterblog/lists/posts/post.aspx?ID=28. Someone also posted a comment about a VHD Resizer tool that looked handy.
Update (4/8/2009): My wife also has a thorough guide for installing SharePoint on a VPC here.
Sunday, March 1, 2009
SharePoint Installation
- Create the following Domain accounts. Remember to give them strong passwords.
- SP2007Admin
- SP2007Search
- SP2007ContentAccess
- SP2007SSP
- SP2007MOSSAppPool
- SP2007Admin
- Install Base Farm with CA
- Create the VM and installed Windows 2003 R2
- Install OS patches
- Install IIS
- Install patches
- Install .NET 2.0 and 3.0 frameworks
- Install patches
- Install SQL Server 2005
- Install latest Service Pack and patches/hotfixes
- In SQL Server add the SP2007Admin account created above to SQL Server…
- Grant the account login access (Security > Logins) to the SQL Server
- Add the account to the following SQL Server Roles (Security > Server Roles): sysadmin, securityadmin, dbcreator
- Grant the account login access (Security > Logins) to the SQL Server
- Log off the VM and log back on using the SP2007Admin account.
- Install SharePoint. This will create the CA (Central Administration) site. By convention I use 5555 as the port for CA.
- Add your account to the Farm Administrators group (Site Actions > Site Settings > Users & Permissions > People & Groups > New > Add Users)
- Add services (Operations > Topology & Services > Services on Server).
- Turn on WSS Search (use [domain]\SP2007Search & [domain]\SP2007ContentAccess accounts)
- Next turn on MOSS Search (use SP2007Search)
- Start Excel Services (only available with SP 2007 Enterprise version)
- Turn on WSS Search (use [domain]\SP2007Search & [domain]\SP2007ContentAccess accounts)
- Create the VM and installed Windows 2003 R2
- Create SSP
**Prerequisite: Search must be turned on and configured.- Application Management > Office SharePoint Services Shared Services
- New SSP
- Create new web app (same screen). By convention I use 6666 as the port for the SSP. Use [domain]\SP2007SSP as the service account.
- Create a new web app for MySites. By convention I use 7777 as the port for MySites. Use [domain]\SP2007SSP as the service account.
- After the SSP has been created login to the SSP (SSP1) using the SP2007Admin account. Under Site Actions > Site Settings > Site Collection Administrator (under Users & Permissions) add your network login ID as a Site Collection Administrator.
- Still in the SSP, Site Actions > Site Settings > People & Groups, click Site Permissions from the Quick Launch bar and add your account with Full Control rights.
- Still on the SSP Home Page, under User Profiles & MySites, click Personalization Services & Permissions. Add your network login ID and select all rights.
- Test your work. Use your own network login ID.
- User Profiles and MySites: User Profiles & Properties. Start a full AD import. (Note the time and day of the week so you can do this before audience compilation.)
- Audiences: Create and compile a test audience.
- Search Settings: not much to test yet…
- Email settings…
- User Profiles and MySites: User Profiles & Properties. Start a full AD import. (Note the time and day of the week so you can do this before audience compilation.)
- Application Management > Office SharePoint Services Shared Services
- Create a Web Application for Content Sites
- In CA > Application Management (tab) > Create or Extend Web Application > Create New
- Use port 80
- Use the [domain]\SP2007MOSSAppPool AD account
- Create the web application and navigate to Create Site Collection via link.
- Create Site Collection using the Publishing (tab) > Collaboration Portal template.
- In CA > Application Management (tab) > Create or Extend Web Application > Create New
Nice California Red (Folie A Deux)
I had a red wine with dinner last night that I thoroughly enjoyed: Folie A Deux - Menage A Trois.
Subscribe to:
Posts (Atom)